| Story of the Green Canoe |
|
The tediousity continues ...
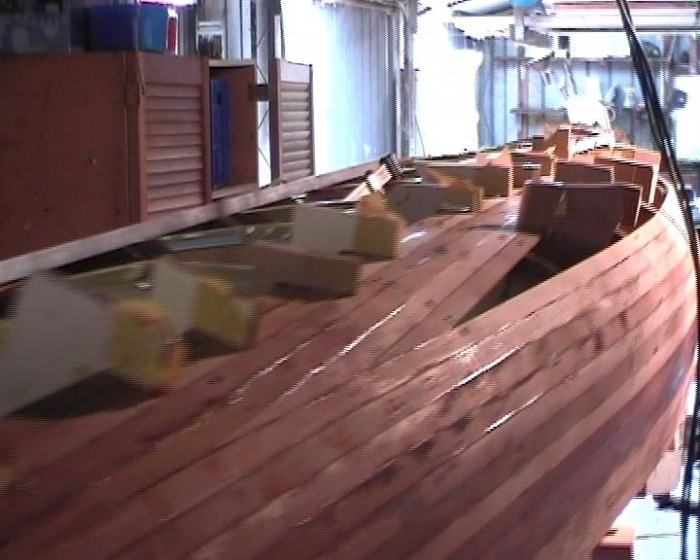
All the planks have to be temporarily fastened while the glue dries, and then the 'fastenings' are taken off. I found roundhead 6 gauge, 20 mm self tapping screws the most useful. Countersunk screws can split the planks when tightened (the planks are only 5 mm thick and 20 mm wide), and are also prone to filling up with glue overruns which makes re-use harder. My marvellous Bosch Electric stapler is the best investment I have made. The staples are pulled out with pliers when I am in the mood. Some planks can be placed on the moulds without any screws at all, though these are pretty rare. The concept of placing some kind of plastic tubing under the staples is a good one, as the staples get glued to the wood very firmly and end up losing a bit of surface wood when the staples are pulled. The only trouble with placing a plastic surface while stapling is that quite often you have your hands full holding down the recalcitrant plank while attempting to pop a staple. The job of putting a piece of plastic underneath adds to the work load. I am not planning on a clear finish, so I am not bothering to minimise the dents and rough bits to a finicky degree. The filling and fairing process will make the surface 'clean' again. The glue is 'Purbond' polyurethene adhesive. It is waterproof and expanding. It fills in gaps wonderfully, so that I dont have to shape the edges of the planks to get a fit. Also, it sands off easily when dry, as it is not so tough as epoxy resin so it doesnt prevent shaping with a sharp chisel or other woodworking gear. If I had to use epoxy resin, I would have not enjoyed the challenge nearly as much, as cleaning up would have been a nightmare. Cleaning up glue runs as you go is ok on the outside, but very hard on the inside of the hull, especially with dozens of staples sticking out to skewer your fingers. Also, reaching across to the other side of the boat at the wide sections is very awkward. Since the glue doesnt dry superhard, I have given up cleaning as I go, and will just sand/chisel/ etc the canoe smooth when all the planks are on. THE GLUE WILL STICK TO ANYTHING EXCEPT BROWN PACKING TAPE (USED IN STICKING CARDBOARD REMOVAL BOXES TOGETHER) EVEN METAL, PLASTIC ETC.
Finishing the Curve at the bilge.
Finally, the last plank on "the edge". The gap left from the last plank to the top of the side was about a 5 mm. Rather than do silly things with little bits of wood, it was time for some epoxy resin, mixed with a lot of "micro-balloons" ( look and feel of talcum powder) to make some sticky but strong gap filler that could be easily sanded to shape later.
The angle of the cuts for the 'fill-in' planks got less angular (therefore easier) the closer to the bilge curve the planks were placed.
Strips of wood covered in packing tape bent the final pieces to the correct angle to give a nice smooth curve.
NOTE - I hadnt planned to do a clear finish on the inside at this stage. If so I would have made sure that the filler used for the last few MM on the curve of the hull had 'Jarrah Dust' added to make it look like wood. It would have saved quite a bit of work.
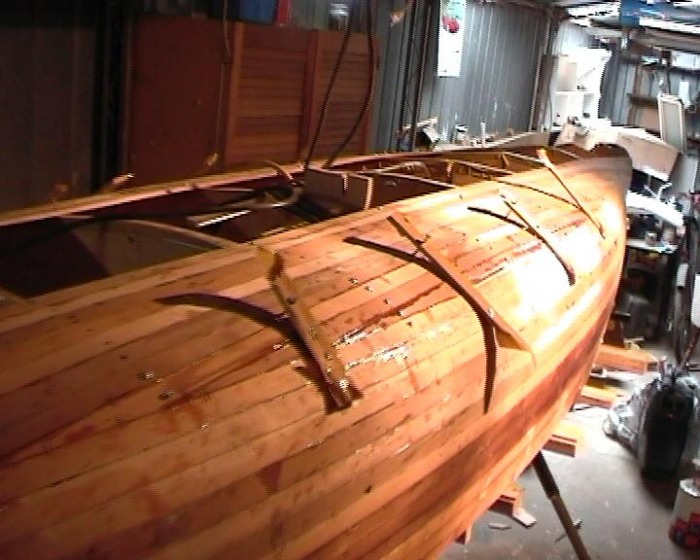
Filling in the Middle
Working towards the centre line only now. Am only able to glue two strips at a time as we work toward the centre. I am pondering the technique for planking to a centre line. I am inclined to run a couple of planks straight down the centre, and cut angles for the curved planks to join in. It seems simpler than trying to cut a perfectly straight line through the rough ends if I fill in one side first ( as suggested in some books). The thought of making all those ends level and straight with no centre guide to go by seems impractical. It also seems more satisfactory from a structural point of view too, as the more uncut, unglued edges, the smaller the number of weak points in the hull.
